Monday, July 6, 2015

Sonoran Spotted Whiptails

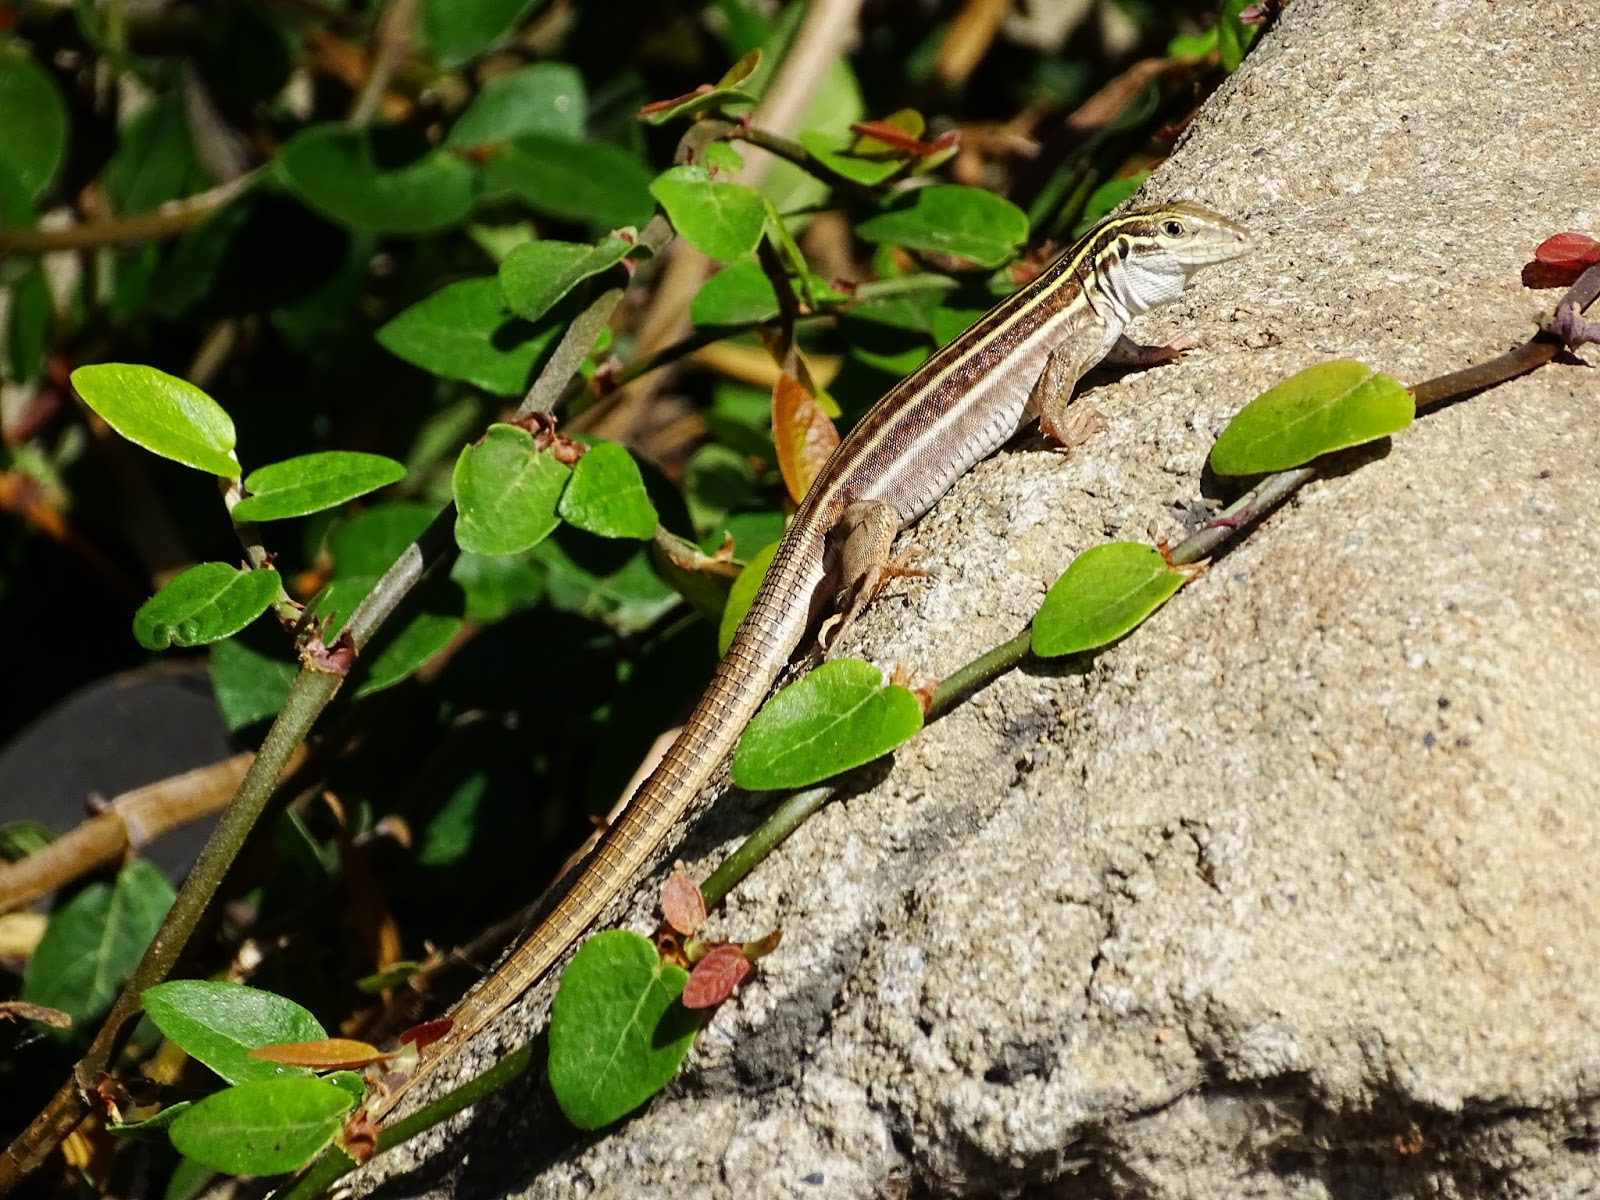
I took some really nice pictures of lizards in a suburban backyard the other day:


The first is a Western Fence Lizard, quite common in Southern California. The second is something more interesting.

The first ID I made for the iNaturalist submission was an Orange-throated Whiptail which is the only similar looking lizard known to live in Orange County. This still looked a bit odd to me, but it isn't unheard of for females to lack the orange under the neck so it still made sense.

Then I got an email:
Hello,
I'm the Curator of the _____ project here on iNaturalist. I saw your recent post of a Belding's Whiptail Lizard from Lake Forest. I was really surprised to see that your locality is at a very urbanized part of Lake Forest. Is that actually the correct locality?
I responded that the location was correct, but I wasn't all that sure of the species. Then the next day I got the following email:
Hi Jesse,
This is really interesting. I have been in communication with a colleague at the USGS who just found whiptail lizards about 2km NW of your location, but also near Jeronimo Lane. We also were unsure of the ID of his lizards, but the current hypothesis is that they are released Sonoran Spotted Whiptails, Aspidoscelis sonorae. My colleague is running some DNA sequencing to determine the ID. We had assumed that this was a very localized population, but your photos suggest that this is a much more widespread population.
Here are the other records:
http://www.inaturalist.org/observations/1635605
http://www.inaturalist.org/observations/1635555
http://www.inaturalist.org/observations/1635586
As with your find, the initial assumption was Orange-throated Whiptails, but we later realized that was incorrect. For your whiptails, I am convinced they are not Orange-throats, but I am not sure of the correct ID. I have changed my ID of your lizards on the iNat record to only name the genus.
This is a very interesting, but also troubling, development. If this is an introduced species, it appears to already have a pretty good sized distribution.
In any case, your observations are especially interesting. I will keep you informed as this develops on our end.
...
If you see any more of these lizards in that area, please post them, but also please change the geoprivacy settings to "obscured" or "private." Part of my concern here is that if these are an introduced species, we don't want others to find them and move them around.
Thanks again for posting to RASCals. It is observations like this one that demonstrate the success of citizen science in urban areas.
 So it is fairly likely that I am only the second person to ever find this lizard in California!


Saturday, July 4, 2015

Gopro and Sidekick in Laguna Beach

I took the sidekick out for the first time last weekend. Unfortunately, the conditions were not good enough to really make a good evaluation of it. With 10-15 foot visibility it is hard to get good pictures and backscatter gets worse in low visibility taking away some of the advantage of a light.

Still, I did get a few pictures which were clearly improved by the light:


In those cases, it was clear that the subject was just too dark. Particularly with the two Garibaldi photos, I would have never got the shot to come out sharp without the light. Under ledges or kelp beds the light really helps.

There is a down side though, a few pictures show quite a bit of backscatter near the top of the image. This is because the light is too close to the camera when using the dive arm:


Fortunately, the effect is only seen near the top of the image. In a large number of photos, it is hidden by blue water:


This is likely to be as far as I go with modifying my setup. It is true that a dive tray with two sidekicks would have some real advantages, particularly for video, but this is starting to get to be a lot of money for little improvement.

Going any farther, it seems like the Gopro needs to be replaced for something else. A mirrorless camera like a Olympus E-PL5 or a Olympus OM-D E-M1 probably makes the most sense for underwater use. A setup for the E-PL5 ends up at $750 for the housing and $400 for the camera while the Olympus OM-D E-M1 is $1300 for the housing and $1000 for the camera. There is probably another $700 before you have a full dive rig, so it is more like $2000 to $3000 for a full mirrorless setup.

Unfortunately, since I use a Sony HX400V superzoom for most my iNaturalist submissions a mirrorless camera would end up dedicated entirely to underwater use or at best a few photos of kids. Since no mirrorless cameras have built in GPS and all require changing lenses to go back and forth between macro photos and photos of distant birds; they just don't make sense for the majority of my photography.

Maybe a DSLR with built in GPS like a Nikon D5300 would work for both the above water, and underwater photography I do. This gets expensive fast though. The camera will be $950, the housing with a flash will be $2000. Then it would be another $1000 or more in lenses to make it work for both the macro and telephoto photography I do on land. Also, all the reviews suggest that the camera has worse GPS than my Sony HX400V. So more than likely, it would only see use underwater.

If I better understood what I wanted, I would have bought an Olympus TG-4 instead of the Gopro. It is optimized for photos rather than video and is in a similar price range. It is too small an upgrade for me to justify while I own the Gopro though. Perhaps in two years I will change my mind once the Gopro is starting to be dated and we have an upgrade or two to the TG-4.

Sunday, June 21, 2015

Sidekick

After pondering the question for some time, I ordered a Sidekick Duo and a dive arm. It seemed like the best light that can easily be mounted on a selfie stick. If it proves to not be up to the task, I will get a dive tray and a second light. to make a rig similar to this one. For video that would produce far superior results.

There are plenty of smart people who say this is underpowered, for example this article claims you should have a minimum of two 1000 lumen bulbs or one 4000 lumen bulb. I have trouble believing the situation is that bad though. The Gopro often produces good photos free diving with no light at all. So it seems to me that going from no lights, to a 600 lumen light should increase the percentage of photos that I end up saving. Given how few photos I get which are decent, this is probably a move from perhaps 1% to 2% but that could still be a big difference given that I am shooting about 3000 photos a trip. There were many shots, such as the one shown below, which a little light could have gone a long way towards improving:


Saturday, June 20, 2015

Gopro Diving Rig

After doing a few dives with the Gopro, it is clear that it needs help to do the sort of underwater photography I have been trying. Most important, there just isn't enough light, so it needs lights.

The bulk of options for lights consist of lights connected to a tray. Examples include the Ikelite Tray with Phantom Underwater GoPro Lighting & Flex Arms Light Kit, BigBlue Underwater 350 Lumen LED Light System, BigBlue 11,600 Lumen Underwater LED Video Light System, SeaLife Sea Dragon 1200 Photo-Video Light and Fotodiox GT-Wedge-Only GoTough Wedge Black Metal Camera Diving Tray. For video, there is no question that this is the way to go. The large tray avoids the wobble which makes much underwater video hard to watch. For photos, I am less than certain. The wedge seems like it would be bulky and hard to get into the desired position.

Next there are options which mount to a selfie stick. Examples include the Knog [qudos] Action Video Light, Light and Motion Sidekick Flood Light, and the SeaLife Sea Dragon Mini 600 Underwater LED Light which can be mounted to a SeaLife AquaPod Underwater Camera Monopod (also sold together). The selfie sticks seem like they are cheaper and would allow closer shots than the trays. However they take worse video and may suffer from more backscatter.

Other possible improvements are filters and macro lenses. I am not sold on the idea that filters are really needed. They reduce the amount of light the Gopro sees and color can be adjusted in software fairly quickly. However macro lenses are an interesting idea. There is a +10 filter and macro lens for the Flip 3.1 filter system which look like they would work well. Unfortunately the manufacturer recommends 1200 lumen lights with them in daylight, which is higher than will easily work on a selfie stick.

Lastly, there is the option of just stopping messing with the Gopro and getting a camera optimized for underwater still images. The Gopro is made for full sun video, it lags much of the competition for taking still images. In the same price range, the Olympus TG-4 is probably a better choice.  An upgrade to a Sony DSC-RX100M III with an underwater housing would also blow away the Gopro.

Sunday, June 14, 2015

Montage Underwater Photographs

In trying to reduce the number of blurry pictures, I turned the Gopro Hero 4 Black EV Comp setting to -1. The hope was that it would force quicker shutter times which would result in less blurry pictures. It worked, I got less blurry pictures. However while the average picture was less blurry, the very best pictures were not nearly as nice. In software I was able to make them brighter, but the lack of light was still noted.

I also experimented with 30 photos over 60 seconds. Unless I can get a selfie stick that can trigger the Gopro while it is five feet away from me, this is probably the best setting. It gives me time to get the stick where it needs to be, while taking 5 photos a second. The timelapse setting had problems since it was only taking 2 photos a second. I often missed things I was sure I caught.

The software editing is still the most impressive thing to me about Gopro. Here is a few before and after shots after just a few seconds of editing:

California Spiny Lobster


Schooling fish in a kelp forest


Garbaldi


Here are a few other interesting things I found:

Spanish Shawl

Green Abalone

Sand Bass

Brown Gorgonian


Saturday, May 30, 2015

Camera Settings for Insect and Bird Photography

Getting a Sony HV400V camera has been quite a learning experience. Previously I had only used a cell phone and a basic point and shoot camera. The number of settings has taken some time to learn. Since I had difficulty finding the best way to go online, I decided to post here what I have found as the best settings for birds and insects.
Birds:
  • Camera Mode: Aperture Priority
  • Aperature: Lowest Number Available, 6.3 at 50x  zoom
  • Focus: MF
  • MF Assist: Off
  • High ISO NR: Normal
  • White Balance: Auto
  • DRO/Auto HDR: D-Range Optimizer Auto
  • Creative Style: Vivid
  • Focus Area: Center
  • ISO: ISO Auto
  • Exposure Comp: Set to CUSTOM button change as needed.
  • Metering Mode: Spot
  • Drive Mode: Cont. Bracket, or Continuous Shooting
  • Image Size: 20M
  • Aspect Ratio 4:3
  • Quality: Fine
  • GPS: On
  • Flash: Off
The idea with bird photography is to get the shutter speed as fast as possible while still getting enough light to get the image. This is because you need a fast shutter speed to take a clear picture through all the wobble in the camera while zoomed in so far. To do this, the Aperture needs set to the lowest number possible and the EV is adjusted until the bird is at the edge of being too dark.

The only deviation from the above I found helpful was to turn on the MF Assist if taking a picture of a really stationary bird. It lets you get a perfect focus, but in most cases it is just too slow, resulting in a missed photo.

Insects:
  • Camera Mode: Manual Exposure or Memory Recall
  • Aperature: Highest Number Available, 8.0
  • Focus: MF
  • MF Assist: On
  • High ISO NR: Normal
  • White Balance: Auto
  • DRO/Auto HDR: Off
  • Creative Style: Standard
  • Focus Area: Center
  • ISO: 80
  • Exposure Comp: NA
  • Metering Mode: Multi
  • Drive Mode: Single
  • Image Size: 20M
  • Aspect Ratio 4:3
  • Quality: Fine
  • GPS: On
  • Flash: On
The idea here is to maximize depth of field so you can see a large percentage of the insect at the same time. Also, using the flash makes the background disappear. I set memory recall 1 to these settings so I can quickly call them up whenever I need them. 
I almost always use a +2 or +4 macro filter for insects.The only exceptions are fast moving insects like butterflies or dragonflies which are easier to photograph following the settings for birds. This makes it possible to zoom in impossibly close and catch details which otherwise cannot be seen.


Saturday, May 2, 2015

1077 Observations

In December, I tried to get more identifications in iNaturalist than anyone else in the history of the site. I succeeded, but only managed to have the second highest number for that month since someone else broke the record by more than I did.

In April I made an attempt to make the most iNaturalist observations during the month. I appear to have succeeded.  During April I submitted pictures/location data for a total of 1,077 creatures. There is still a chance someone will unseat me by turning in more observations they made during April but I am in a healthy lead over second place so this seems unlikely. As for the all time record, I am well behind that. Last August someone made 1,754 identification. Doubt I will make a try at that record, it seems challenging to do while having a job.

Sometime I will make an attempt at most species in a month though. That is harder than most observations since technically I can separately submit a whole bunch of blades of grass in a park and hit most observations. Most species requires spending a lot of time in as many different ecosystems as possible which might be an interesting challenge.